DokioStore plugin
The plugin is required to synchronize data between DokioCRM and the WooCommerce online store.
The data that can be synchronized from DokioCRM to the WooCommerce are:
- ● Product categories
- ● Product attributes
- ● Attribute terms
- ● Products
- ● Product variations
The data that can be synchronized from the WooCommerce to DokioCRM are:
- ● Orders
The synchronization period is every one minute.
Synchronization task sequence:
Product categories → Product attributes → Attribute terms → Products → Orders
DokioStore installation
1. Download WordPress plugin DokioStore from the download page .
The version of DokioStore must be the same as your DokioCRM version. The version of DokioCRM placed in the bottom of Sign-in block. The version of DokioStore plugin placed in the top right corner of plugin interface.
2. Install the DokioStore plugin to the WordPress as a plugin (Plugins → Add new → Upload plugin) and activate it.
3. Click on DokioStore located at the sidebar. You will see the plugin settings:
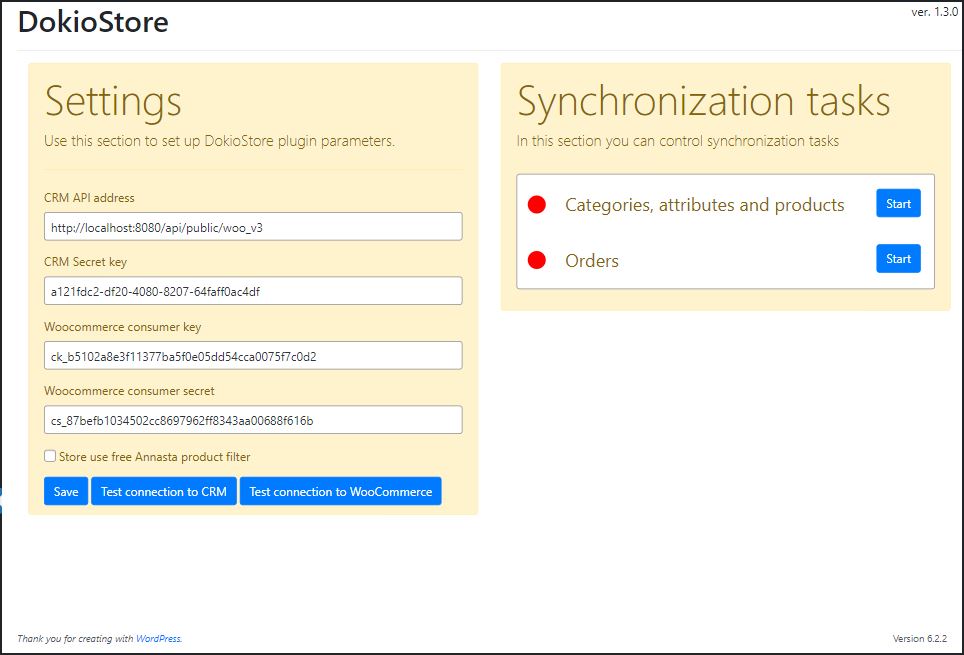
Setup
For successful connection of the plug-in with DokioCRM and WooCommerce, you need to fill correctly all the fields in the Settings section:
CRM API address
It consists of <your DokioCRM site address>/<way to the store api>/woo_v3
For example: https://dokio.me/api/public/woo_v3
At this stage you can check its correctness: click the Save button, then the button Test connection to CRM.
If the API is correct, you will see the message There is a connection, but wrong CRM secret key! or WrongCrmSecretKeyException.
CRM Secret key
Copy the value from the field CRM Secret key of your Online-store document, and paste it into this field. Click Save (and, if you've generated the CRM Secret key in the Company document just now, save the Company document as well).
Then click the button Test connection to CRM. Now, if the Online-store document's filed IP Address of the online store has correct data, you will see the message Ok! Connection test passed!
Also, at this stage you may see a message like this: Connection test request failed! Connection test controller error! java.lang.Exception: The store remote address in query is not equals to store remote address in CRM. Query remote address: YYY.YYY.YYY.YYY, CRM remote address: XXX.XXX.XXX.XXX
It means that the DokioCRM api sees the IP address of the online store not the way you wrote it in the IP Address of the online store field of the Online-store document. In this case just change the value of the field IP Address of the online store to the value that from the error message named Query remote address, save it and test connection again.
Woocommerce consumer key, Woocommerce consumer secret
These fields are required for connection to the WooCommerce API. You should generate these values:
1. On the WordPress sidebar click WooCommerce → Settings
2. Click Advanced tab
3. Click REST API
4. Enter the Description e.g. "Keys for DokioCRM" and select User
5. Select Read/Write in the Permissions field
6. Click Generate API key

7. Copy both Consumer Key and Consumer Secret values and store them in a safe place.
8. Fill the DokioStore plugin's fields Woocommerce consumer key, Woocommerce consumer secret according to the received values.
9. Click on the Save button.
10. Then click the button Test connection to WooCommerce. If the both fileds has correct data, you will see the message Ok! Connection WooCommerce test is passed!
Start data synchronization
Now that all the required fields have been filled and the connection test has been passed successfully, you can start the data synchronization task.
In the Synchronization tasks section press the Start buttons for both tasks one by one. The indicators should change from red to green. We recommend reload the page in your browser and after pay attention to the color of the indicators again to make sure that the synchronization process is running.
After running synchronization tasks, if you have the categories in DokioCRM, marked as the category of this Online store, then these categories and all products of these categories will be created in the WooCommerce, and after they will be updated at intervals of 1 minute. The attributes, in which this internet store was selected, will be synchronized in WooCommerce too and will be updated at the same interval.
Orders also will be checked with 1 minute interval.
Features of the plugin
● The minimal time interval of starting synchronization task is 1 minute.
● The next cycle does not start until the previous cycle has completed.
● The information about all product categories refresh only if:
- When saving selected stores for multiple categories
- When update category, if it was/is/become a store category
- When creating category that marked as "online store category" and has store(s)
- When deleting categories that marked as "online store category"
● The information about product attributes and attribute terms refreshing if:
- When update Attribute - resynchronizing this attribute and all its terms
- When saving Term - this term
● The information about products/services and variations refresh only if:
- When saving selected stores for multiple categories - all products of these stores in these categories
- When saving Attribute - if there are new added stores to this attribute - mark products that have this stores and attributes
- When saving Product that was represented as a Variation of another product, but now is a Simple
- When set categories to multiple products - all these products
- When completing or decompleting any document that affects on product qtt or its reserves - all products of this document
- When saving store and language / price types / departments was changed - all store's products
- When batch product prices changing - all products that prices was changed
● DokioStore plugin creates log files. You can find them at your_site_root_directory/wp-content/uploads/ErpStore_logs. Each day DokioStore plugin creates the different log file. We recommend clean old log files from time to time to avoid disk overflow.
Update DokioStore plugin
1. Go to the DokioStore plugin and stop the synchronization task by clicking on the Stop button in the Synchronization tasks section.
2. On the WordPress sidebar click Plugins → Add new → Upload plugin
3. Click the Select file button
4. Select the .zip file with DokioStore plugin and click the Install button
5. After plugin upload you will see a dialog like this:
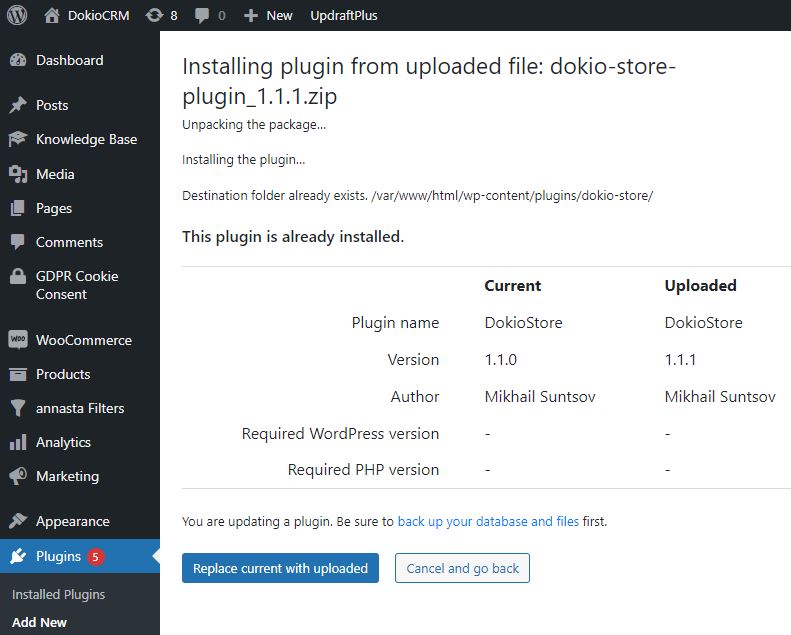
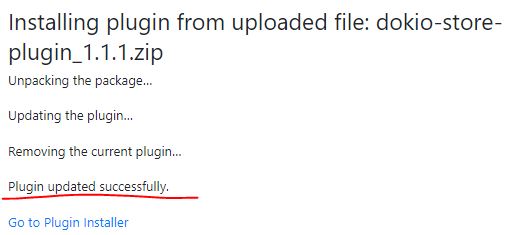
Click Replace current with uploaded button and wait for the message Plugin updated successfully:
6. Go to the DokioStore plugin and start the synchronization task. Make sure that the indicator changed the colour from red to green.